Display Photos from OneDrive on your Windows Lock Screen

This post is about how I did this in such a way that I could curate the photos on an ongoing basis with minimal effort.
My New Media Center PC
After years of using a Google Chromecast to watch YouTube and TV I talked myself into buying a Geekom Mini PC instead as a media center.
Nowadays I pretty much only watch on-demand telly, YouTube, and live TV on major channels, all over the internet. My 2nd gen Chromecast doesn’t give the best experience for this any more; you can’t log into your YouTube account, remote control is ropey, and casting over Wi-Fi often fails.
By contrast, I reasoned, I could spend 250 quid, get an Intel i7 Windows machine and a wireless keyboard and not only would I get a smooth TV experience, I’d also be able to play a whole host of games* which – having not owned a Windows PC for about 14 years – was a proposition overall that I think was worth that money!
Digital Photo Frame
One thing I’d always planned to do with the Chromecast was to make it so that my favourite photos showed on the idle screen.
By default on the Chromecast you see a selection of random (very nice) images from Google Photos. “However”, I thought, “I have nice photos of my own!”
By default I dump all my photos into Microsoft OneDrive to keep them available wherever I am and backed-up in the cloud. Accumulated over twenty years, amongst tens of thousands of average-joe quality digital photos, are some that I really quite like. Once in a while it would be nice to actually look at them!
My plan was to “sync” the photos I wanted from OneDrive to a Google photos album which would allow me to show them on the Chromecast idle screen. However, having got the media center PC, I switched focus to getting the photos to display on the Windows Lock Screen instead.
The Vision
OneDrive obviously integrates with Windows but the standard setup did not quite do what I wanted. I wanted a curated set of photos shown on the lock screen and the best OneDrive offered was to sync whole folders of photos to local devices. The way my photos are organised I’d usually only want one or two pictures from a folder to display on the lock screen.
So I planned to write my own script to sync just the pictures I wanted to the media center. The plan was:
- Set up the PC to display images from a local folder on the lock screen.
- Set up the PC to go to the lock screen when idle e.g. 5 minutes after finishing watching TV.
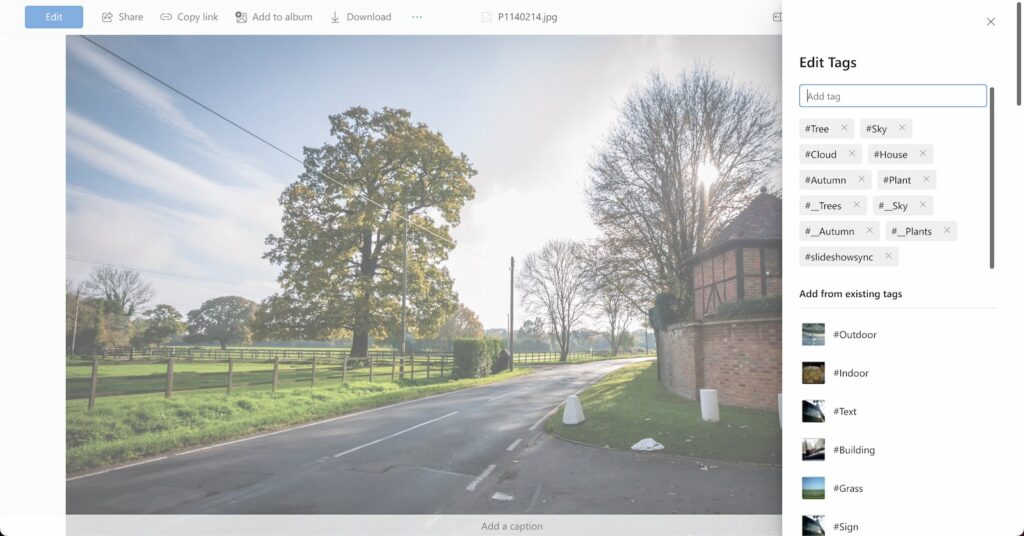
- Write a script to selectively download photos from OneDrive to the lock screen folder. I would do this by tagging the photos and only downloading the ones which had a specific tag. I chose a tag that wouldn’t naturally appear on any photos: “
slideshowsync”. - Run the script on a schedule to download the tagged files on a regular basis.
- Go and tag all the photos I wanted on the lock screen with the tag.
In this way I would have just the photos I wanted stored on the PC and at any time I could tag or untag the photos in OneDrive to control what was displayed on the lock screen. No additional curation or duplication of the files would be needed.
I Thought Personalising Windows Was Easy!
I fully expected the simplest part of this to be to get Windows 11 to display random photos on the lock screen but I ended up spending ages tuning this to be how I wanted.
My aim was simply to have a static random image which changed every few minutes with no cheesy transitions. By default however the Windows 11 “lock screen slideshow” mode changes the photo every 5 seconds or so with a nasty harsh transition between images and the uber-distracting Ken Burns effect running perpetually 😡.
Beyond this, getting the PC to go into the lock screen mode and stay there without turning off the display or going to sleep was mindblowingly difficult. I felt as though conflicting settings baked into Windows over many years made this less than simple and hard to test.
In the end here’s how I configured everything…
Dynamic Theme
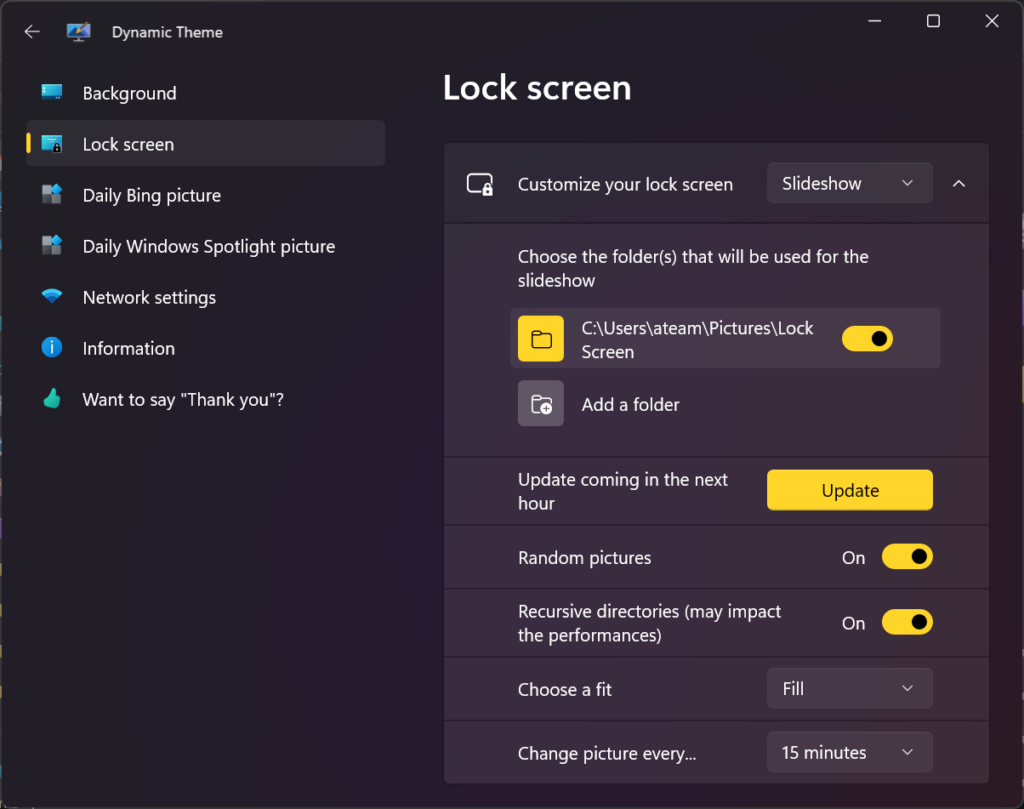
Windows Lock Screen Settings
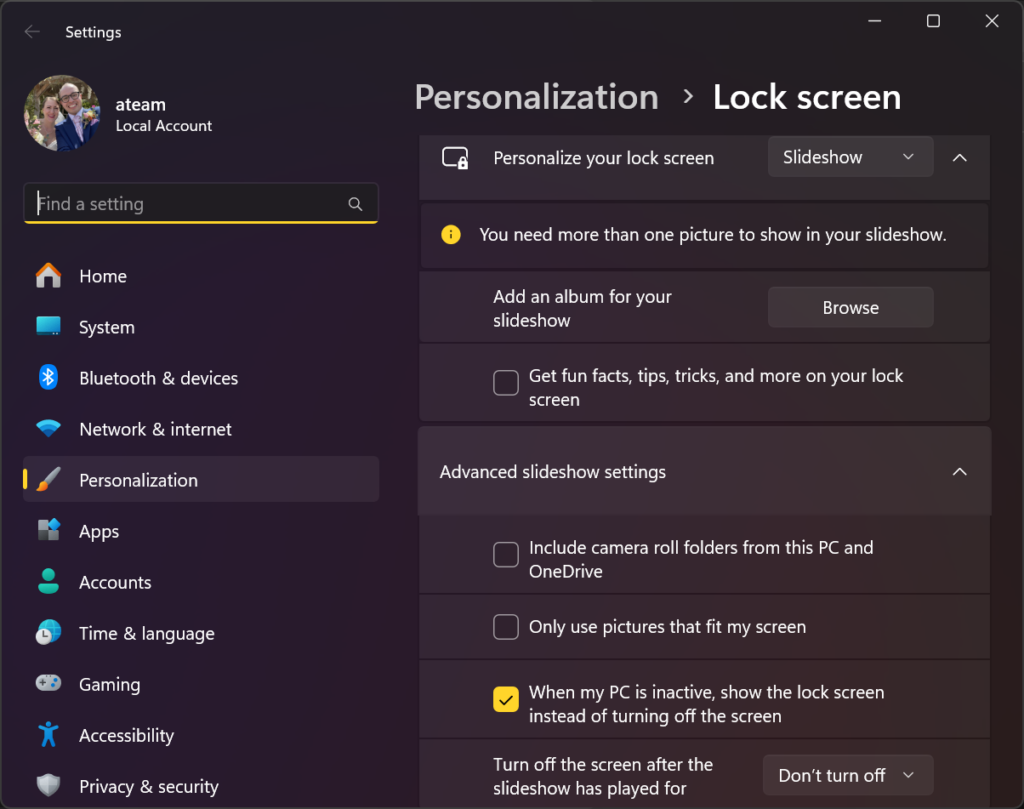
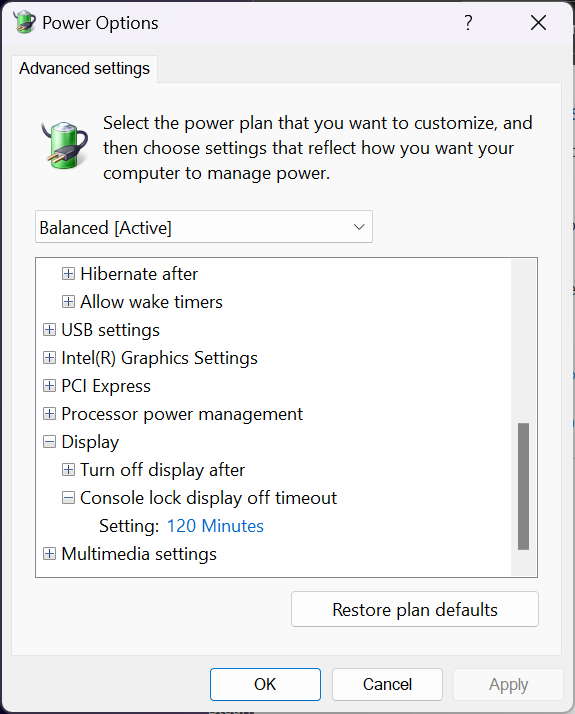
Windows Power Settings

However there was a problem: the computer would hit the lock screen after 5 minutes, then shortly after the display would turn off, meaning you wouldn’t get the effect of the PC behaving as a digital photo frame.
I could have set Turn display off to “Never” but then you’d only be able to reach the lock screen by manually locking the PC. What to do?
There was one final setting I needed which is hidden by default. It’s called Console lock display off timeout and you need to enable it in the registry before it can be changed.
I think it’s worth recapping the settings balancing act as I found it pretty confusing…
- Use the native Windows Lock Screen settings to specify that the “display off” timeout should actually send the PC to the lock screen.
- Set the “display off” timeout to the amount of time you want the computer to be idle before it locks. This now won’t actually turn the display off, despite the name of the setting.
- Change the hidden Console lock display off setting to delay the PC from going to sleep after it’s reached the lock screen. By default the screen would otherwise go off shortly after hitting the lock screen.
- Set the sleep timeout to eventually send the PC and screen to sleep (unless you want it on indefinitely).
If you were happy manually-locking the PC, or using the “walk away” lock feature, maybe you could set the display timeout to “Never” which would apparently negate the need to set the Console lock timeout! 🤷🏻♂️
PowerShell Script to Sync Selected OneDrive Photos by Tag (The clever bit)
What I thought would need considered effort is was the script to fetch the photos from OneDrive. This almost turned out to be the easy part!
My first thought was to learn how to build something in .NET but I quickly realised PowerShell would be a more natural choice. The script would be largely procedural and PowerShell has a mature ecosystem including a very useful OneDrive library which would cut out a lot of HTTP boilerplate.
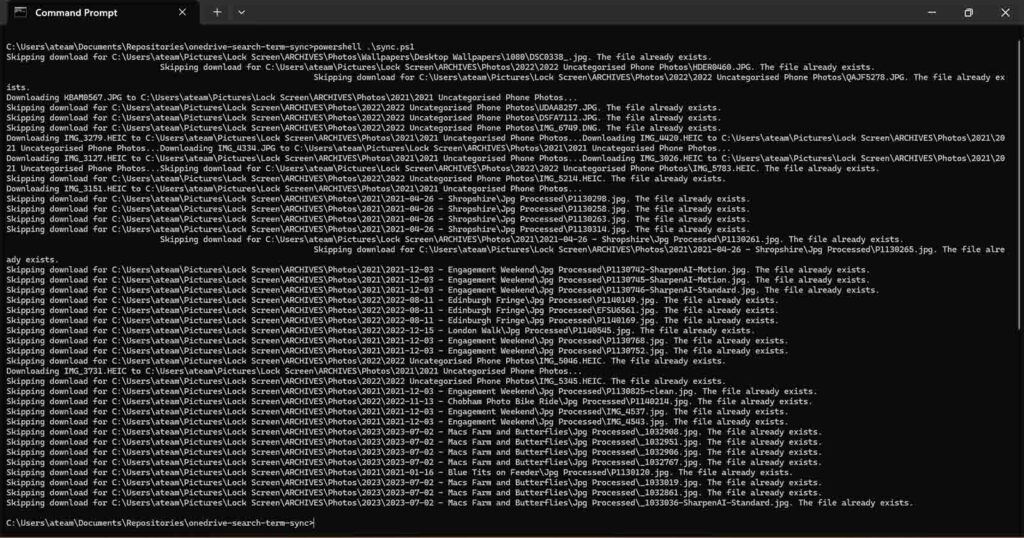
All the script ultimately does is retrieve all the search results associated with the arbitrary tag I set on the photos and downloads those files locally. Subsequent runs work out the delta of the search results and skip or delete existing files as necessary.
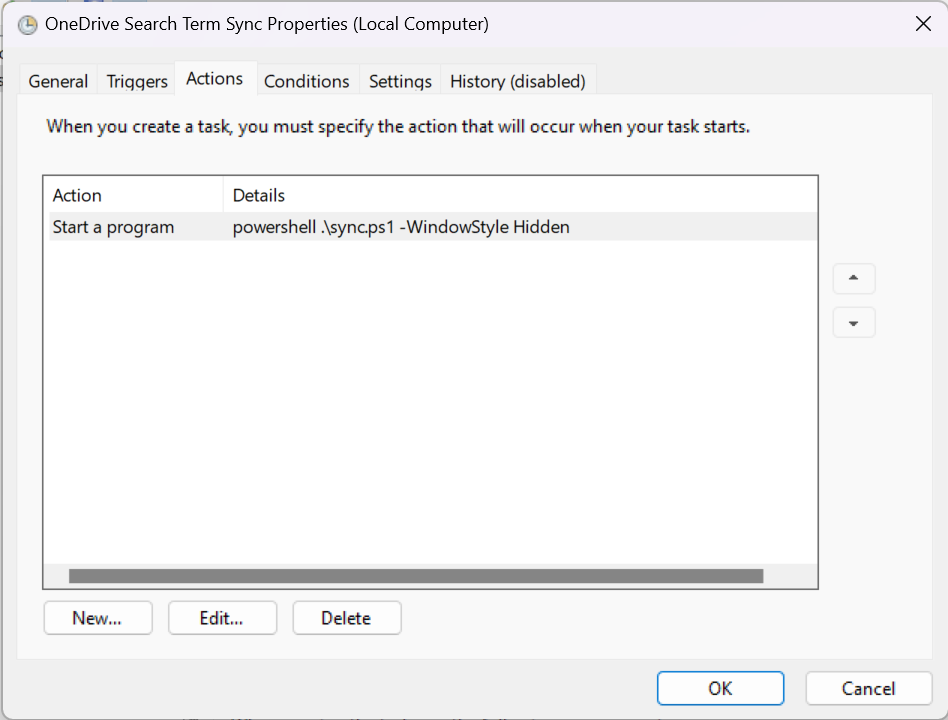
Once I had this all working, I put it on the classic Windows Task Scheduler to be run each time I log on to the PC.
powershell .\sync.ps1 -WindowStyle Hidden
The Final Results
Everything now works pretty much as I’d envisioned. I can tag photos in OneDrive, and next time I log on to the media centre, new photos are available for the lock screen which randomly displays them and changes elegantly every 15 minutes.
The PC won’t go idle whilst watching media and as long as we exit fullscreen when we’re finished the PC manages itself into lock mode and we can enjoy an ambient photo experience on our living room TV.

A couple of small followups I haven’t yet got around to. (a) I’d like to work out how to display HEIC photos as many of my photos are in this native Apple format but Dynamic Theme doesn’t seem to pick them up. (b) I’d like to have the script run invisibly whereas, at the moment, I see the shell window pop up for a short time (increasing with the number of synced files) upon logon. I just need to get some permissions settings right to do this, I think!